
在 Arduino 項目中,使用 OLED 顯示屏可以為用戶提供直觀的交互界面。本文將介紹如何使用 Arduino 和 U8g2 庫創(chuàng)建一個簡單的 OLED 菜單顯示器,以便用戶可以瀏覽和選擇不同的菜單選項。
準(zhǔn)備材料:Arduino 開發(fā)板
SSD1306 128x64 OLED 顯示屏
兩個按鈕,用于向上和向下滾動菜單選項
代碼解析:
首先,我們需要導(dǎo)入 U8g2 庫,并設(shè)置 OLED 顯示屏的引腳和類型。在這個示例中,我們使用 SSD1306 128x64 OLED 顯示屏。
#includeU8G2_SSD1306_128X64_NONAME_F_HW_I2C u8g2(U8G2_R0, /* reset=*/ U8X8_PIN_NONE);
接下來,我們定義了一些變量,如選中的菜單選項、菜單選項的數(shù)量、菜單高度和行高等。
int selectedOption = 0;
const int numOptions = 8;  // 假設(shè)有8個菜單選項
const char* options[] = {"Option 1", "Option 2", "Option 3", "Option 4", "Option 5", "Option 6", "Option 7", "Option 8"};
const int menuHeight = 64; // 菜單高度(像素)
const int lineHeight = 12; // 每行的高度(像素)
const int visibleOptions = menuHeight / lineHeight; // 可見的菜單選項數(shù)量
我們還定義了兩個按鈕的引腳,用于向上和向下滾動菜單選項,以及滾動的速度。
const int scrollButtonPin = 2; // 向下滾動按鈕所連接的引腳
const int scrollUpButtonPin = 3; // 向上滾動按鈕所連接的引腳
const int scrollSpeed = 200; // 滾動速度(毫秒)
然后,我們實現(xiàn)了 drawMenu() 函數(shù)來繪制菜單。該函數(shù)使用 U8g2 庫來繪制選項和滾動條,并根據(jù)選中的菜單選項進行高亮顯示。
void drawMenu() {
  u8g2.firstPage();
  do {
    u8g2.setFont(u8g2_font_6x10_tf);
    int startOption = selectedOption - (visibleOptions / 2);
    if (startOption < 0) {
      startOption = 0;
    } else if (startOption + visibleOptions > numOptions) {
      startOption = numOptions - visibleOptions;
    }
    for (int i = 0; i < visibleOptions; i++) {
      int optionIndex = startOption + i;
      if (optionIndex >= 0 && optionIndex < numOptions) {
        if (optionIndex == selectedOption) {
          u8g2.drawBox(0, i * lineHeight + 2, u8g2.getDisplayWidth() - 4, lineHeight);
          u8g2.setDrawColor(0);
          u8g2.setFontMode(1);
        } else {
          u8g2.setDrawColor(1);
          u8g2.setFontMode(0);
        }
        u8g2.setCursor(2, i * lineHeight + 10);
        u8g2.print(options[optionIndex]);
      }
    }
    // 繪制滾動條
    int scrollBarHeight = menuHeight / numOptions;
    int scrollBarY = (menuHeight - scrollBarHeight) * selectedOption / (numOptions - 1);
    int scrollBarWidth = 2;
    u8g2.setDrawColor(1);
    u8g2.drawBox(u8g2.getDisplayWidth() - scrollBarWidth, scrollBarY, scrollBarWidth, scrollBarHeight);
  } while (u8g2.nextPage());
}
接下來,在 setup() 函數(shù)中,我們初始化 OLED 顯示屏和設(shè)置按鈕引腳。
void setup() {
  u8g2.begin();
  u8g2.enableUTF8Print();
  pinMode(scrollButtonPin, INPUT_PULLUP); // 設(shè)置向下滾動按鈕引腳為輸入,帶上拉電阻
  pinMode(scrollUpButtonPin, INPUT_PULLUP); // 設(shè)置向上滾動按鈕引腳為輸入,帶上拉電阻
}
最后,在 loop() 函數(shù)中,我們使用按鈕的狀態(tài)來滾動菜單選項,并調(diào)用 drawMenu() 函數(shù)來更新顯示。
void loop() {
  if (digitalRead(scrollButtonPin) == LOW) {
    selectedOption = (selectedOption + 1) % numOptions;
    drawMenu();
    delay(scrollSpeed);
  }
  if (digitalRead(scrollUpButtonPin) == LOW) {
    selectedOption = (selectedOption - 1 + numOptions) % numOptions;
    drawMenu();
    delay(scrollSpeed);
  }
}
效果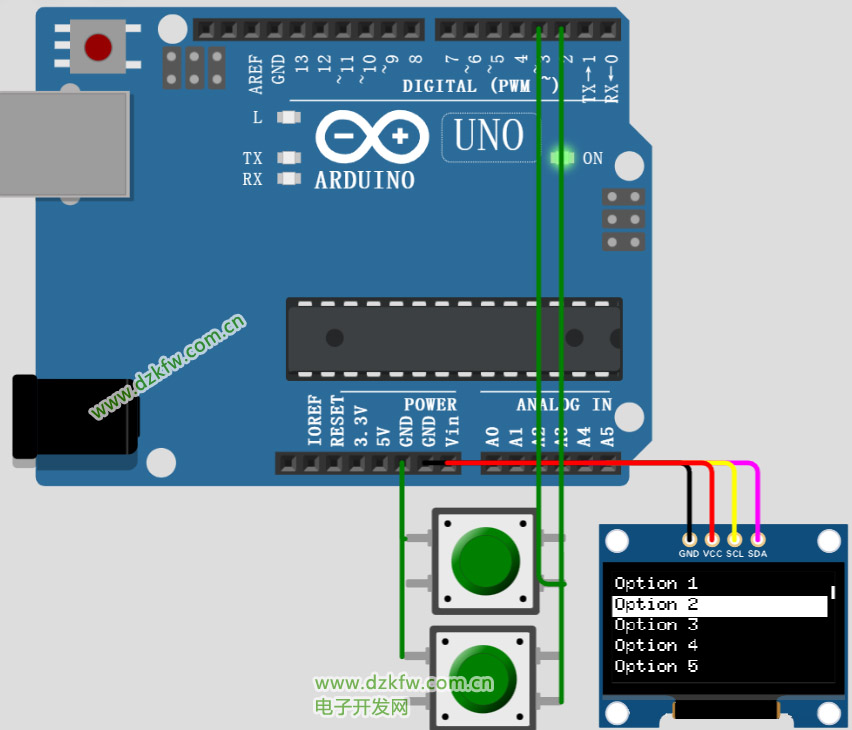
 返回頂部
返回頂部 刷新頁面
刷新頁面 下到頁底
下到頁底